Note: With the discontinuation of Universal Analytics as of 1 July 2023, this article is no longer relevant, as these tips apply to Universal Analytics accounts. Please visit my tutorials page for other helpful content.
There’s nothing more annoying than visiting your Google Analytics account and finding it full of junk data and fake websites.
How on earth are you supposed to see what’s going on with your website with all that Google Analytics spam screwing things up?
Fortunately, there’s a few simple steps you can to take to block those naughty spam bots and stop them destroying your Analytics data.
And then you’ll finally be able to see the true picture of what’s happening on your website.
In this guide, I’ll to walk you step-by-step through everything you need to do, so you can clean up your data and get back to focusing on the stuff that really matters.
Contents
Note: This tutorial is more than 10,000 words long, so I created this table of contents to help you to navigate your way quickly and easily through the steps.
- Why it matters
- Laying the right foundations
- Steps for brand-new sites
- Exclude new spam data
- Exclude old spam data
- Remove yourself
- Advanced methods
- Ongoing maintenance
- Enjoy your clean data
Note:
- All of the screenshot images in this tutorial can be enlarged by clicking on them.
- This tutorial was created using Google Analytics on a Windows 7 desktop computer using Chrome. If you’re using the mobile app, or a different browser or operating system, you may need to modify the instructions to suit.
Why it matters
Think of the spam in your Analytics account like graffiti (the ugly kind).

All it does is mess up the place and make it hard to see what’s underneath.
And if there’s too much of it, you can’t see anything useful at all.
So how will you know what’s working – and what isn’t – on your website?
What a headache!
And there are other problems too.
Spam bots can slow down the servers hosting your website and waste valuable resources, and they can also be a security risk.
Usually they’re trying to harvest email addresses, create fraudulent clicks, register fake accounts or spread malware, and none of that is good news.
![]() Important: Never visit suspicious-looking sites in your browser, or you may end up with a nasty virus. Use a tool like GeoPeeker or WebPageTest to look at a screenshot of the site, or do a quick Google search for the domain (but don’t visit the site!) and see if it is legitimate without going anywhere near it.
Important: Never visit suspicious-looking sites in your browser, or you may end up with a nasty virus. Use a tool like GeoPeeker or WebPageTest to look at a screenshot of the site, or do a quick Google search for the domain (but don’t visit the site!) and see if it is legitimate without going anywhere near it.
Note: Not all bots are bad. Things like the Google bot are essential for ensuring that your website is properly indexed, so that it shows up in search results. So be kind to bots, but only the good ones!
And Google Analytics spam can be even more of headache for smaller sites, simply because it makes up a larger percentage of all of your traffic in the early days, so it’s even more likely to overwhelm any meaningful data.
The two types of spam
There are two main types of spam that can mess up your website data:
- Ghost spam
- Crawler spam
and we need to fix these two problems differently.
Ghosts never actually visit your site. Instead, they send data directly to your Google Analytics account, using your unique tracking ID.
They pretend to be your website, capturing real traffic, but instead fill your reports with fake visits.
Crawlers do actually visit your site, and these are usually spam bots.
They totally ignore your robots.txt file (which the good bots respect) and wander rudely through your site, leaving a trail of junk data in their wake.
Four mistakes to avoid
If you go looking, you’ll come across heaps of different suggestions for ridding your Google Analytics account of spam.

Some of them are good, and others are either totally pointless or downright hazardous to your data.
So make sure you avoid these traps when removing Google Analytics spam from your account.
Mistake #1 – Assuming your site has been hacked
Just because you discover a bunch of rubbish in your Google Analytics data does not mean you need to panic.
If you can still log into your site and your site is behaving normally – for you and for your visitors – then chances are that it’s just spam, and your site has not been hacked.
Take a deep breath and relax.
Mistake #2 – Worrying about bounce rate
Although it’s true that crawler spam distorts your site’s bounce rate in your Analytics reports, rest assured that it won’t adversely affect how your site is ranked in Google.
Google have very clearly stated, many times over, that your Analytics data is not used as a measure of your site’s quality for the purposes of ranking.
So don’t stress about it.
Just clean up your data so you can see what your true bounce rate is, and then you can work on improving that.
Mistake #3 – Trying to block ghost spam using htaccess
Some solutions to the Google Analytics spam problem involve adding code to your website’s htaccess file.
This can be a reasonably effective way to block crawler spam, but it does nothing at all to stop ghost spam, so it’s not enough on its own.
Editing your htaccess file is also not for the faint of heart – one character out of place can take your entire site offline.
Fortunately there are ways to clean up your website data without ever having to touch your htaccess file.
Also, some web hosting companies don’t use htaccess files, so even if you do decide to try this approach, it may not work for your website.
Mistake #4 – Using the referral exclusion list
This one is probably one of the most dangerous mistakes to make when trying to fix your Analytics spam.

There’s a section in your Google Analytics account in the Admin area under “Tracking Info” called “Referral Exclusion List”.
This list is used to clean up your data when you use an external shopping cart or payment provider (e.g. PayPal), to stop your customer’s return visit being recorded as a completely new visit.
If you use this list to block spam referrers, you’ll actually make your data worse than it already is.
When you add spam referrers to this list, all that happens is that the information about where they came from will be stripped away.
In other words, the spam visits will still be in your reports, messing them up, but now you can’t even get rid of it because it’s listed as “direct” traffic, which you have no way of identifying.
So don’t do this, OK?
Fortunately, it’s not something you’re likely to do by accident, and now you know to stay well clear of it.
Phew!
So now you know:
- why you need to get rid of spam
- what the two types of spam are, and
- the the traps to avoid
which means it’s time to lay some really solid foundations for your Google Analytics data.
Laying the right foundations
Before you start fixing up your Google Analytics data, there’s something really important you need to do.

You need to protect your data.
If you don’t do this step, any mistakes you make while you’re trying to fix things could totally wipe out your Google Analytics data, leaving you worse off than before.
So how do you protect your data?
Simple. You create multiple views.
A view is basically just a big bucket that holds all of your website traffic data.
When you create multiple views, you’re creating a copy of your data with one important difference – it only starts collecting data from the moment you create it.
I always set up three views for any new website I add to Google Analytics:
- Active data – A view of your website data that excludes the spam, which will be your main view
- Raw data – An unfiltered view of the data, with everything included, even the spam
- Test data – A third view for testing out filters and other settings, before you apply them to your active and/or raw data views
If you’re starting out with a brand new site, you can set up these three views from the beginning.
If you have an existing site that you’ve already been collecting data for, you’ll want to keep your current view as your “active data” view, and then copy it to create the other two views.
Remember, your view only starts collecting data from the moment you create it.
How to create multiple views

Log into your Google Analytics account and click on the “Admin” section.
Make sure your website is selected in the middle “Property” column, and you should have your default view selected in the right “View” column.
Click on “View Settings”.

Look to the top right-hand side of the “View Settings” section for the “Copy view” button.
Click “Copy view”.
Enter a name for this new view to match how you’ll be using it (e.g. “raw data”) and click “Copy view”.
The current view will be copied to a new view, and will begin collecting data.
Repeat these steps to create your “test data” view.
You’ll also want to go back and rename your original view to “active data”.
Example naming for views
Here’s how I name my three views for one of my sites:
- 1 – www.eatingvibrantly.com (active data)
- 2 – www.eatingvibrantly.com (test data)
- 3 – www.eatingvibrantly.com (raw data)
Note: Numbering them is optional, but it’s a handy way to make the views display in a specific order in the list of views.
All of your settings are copied between views, so if you have any filters already set up, make sure to remove them from your “raw data” view.
Steps for brand new sites
If you have a completely new site, or you haven’t yet set up Google Analytics on your website, there’s a couple of extra things you can do at the start to make it harder for junk to get into your data in the first place.
Both of these tricks work by making it harder for spammers to guess or discover your Google Analytics Tracking ID, which only gives you a small amount of protection from spam, but it’s still worth doing.
Step 1 – Use a Google Analytics tag that ends in a higher number
By default, when you set up a new Google Analytics account, the first property you create (usually your main website) has a Tracking ID that ends in -1 (e.g. UA-12345678-1).
Ghost spammers (who never actually visit your site), tend to send data to Tracking ID’s that end in -1, so by using a tracking code that ends in -2 or -3 (or anything that’s not -1) you reduce the chances that spammers will successfully send junk data to your account.

So instead of using the first property you create to track your website, rename that one to “Dummy Property” or something you’ll instantly recognise, and never use it for tracking anything.
Next create a new property to use for your actual website.
Because it’s the second property you create, its Tracking ID will end with -2.
Of course, as soon as you add the tracking code for this new property your site, it will appear in the source of your page, so it’s not very well hidden and some spammers may still discover it anyway, but every little bit helps.
Step 2 – Use Google Tag Manager (optional)
If you want to mask your Tracking ID further, you can set up your Google Analytics tracking using Google Tag Manager.
When you use Google Tag Manager, your Tracking ID doesn’t actually appear in the source of your page, so it protects it from spammers a little better.
However, using Google Tag Manager adds another layer of complexity to using Analytics on your site, so I don’t recommend it if you’re just starting out with Google Analytics.
You can visit Google’s website to learn more about Google Tag Manager.
Exclude new spam data
Whether you have a new or existing website, the following steps will exclude spam from your Analytics data.
However, these changes will only affect all new data collected after you make these changes, and will have no effect on your old data. We’ll fix that problem later.
To protect your existing Analytics data, I strongly recommend that you complete the next three steps for your “test data” view first, and then let it collect data for a few days to make sure you’re seeing the data you expect in your reports.
Once you’re happy that you’ve implemented these changes correctly, then you can apply them to your “active data” view.
Step 1 – Turn on Google’s “Bot Filtering”

A little while back, Google added a “Bot Filtering” setting to the “View Settings” section in Google Analytics.
It’s supposed to “Exclude all hits from known bots and spiders”, and people hoped that it would magically clean up their Analytics data.
Sadly, Google’s “known bots and spiders” list is not comprehensive enough to keep your data spam-free, and it doesn’t address all the different sources of spam data, but it’s an excellent start.
To switch it on, visit your the “View Settings” tab for your view, check this box and save your changes.
Step 2 – Filter out ghost spam with a hostname filter
Because ghost bots never actually visit your site, they don’t know what your domain name is, so their “pretend” visits can’t include your domain name in their junk data.
You can easily exclude this kind of traffic by adding a filter to your view that only allows traffic that includes your domain and subdomains as the “host name”.
A hostname is basically any of the valid addresses that someone can view while visiting your site.
For example, on this site, the domain name is ‘thebizpixie.com’, but valid hostnames might be things like:
- thebizpixie.com
- shop.thebizpixie.com
- blog.thebizpixie.com
and if you use multiple hostnames for your site, you’ll want to make sure you allow for all of them in your hostname filter.
Note: If you have domains that redirect automatically to your main site, don’t include them in this list
Find your valid hostnames

If you have existing data in your analytics account, you can find a list of valid hostnames in your Google Analytics reports.
- Go to the “Reporting” section of your account, for your “active data” view
- Go to Audience > Technology > Network
- Change the primary dimension (above the data table) to ‘Hostname’
- Choose a really long time range (1 to 2 years, or as much data as you have)
If you don’t remember ever installing your Analytics tracking code on any site in this list, then it is most likely ghost spam.
Keep in mind that you may have installed your tracking code on other sites like third-party shopping services, YouTube, or elearning platforms.
Note: For clarity, you’re better off to set up things like YouTube and elearning platforms in their own property, with their own unique tracking code.
There are a few sites that are OK to leave, including:
- translate.googleusercontent.com – used when people translate your pages using Google Translate
- webcache.googleusercontent.com – used when people view Google’s cached version of your pages
- googleweblight – used by Google when displaying your pages on certain mobile networks
However, for most people with simple websites, it’s enough to include only traffic from your domain.
In my example above, only the highlighted hostnames are valid, and even if I didn’t bother to include Google’s valid domains, I’m not going to lose much data, but I will get rid of heaps of spam traffic.
Set up the hostname filter

Go to the “Admin” section of your account, and find the view you want to add a filter to.
Click on “Filters”.
If you’ve never set up any filters before, you’ll see something like this:

Click “Add Filter” to add a new filter to the current view, and use the following settings:

- Leave “Create new Filter” selected
- Type a name for your filter in “Filter Name” e.g. “Include valid hostnames (yourdomainname.com)”
- Select “Custom” under “Filter Type”
- Change the type from “Exclude” to “Include”
- Select “Hostname” under “Filter Field”
- Enter
yourdomainname\.comin the “Filter Pattern” field, replacing ‘yourdomainname’ with your actual domain
Note: The backslash character ‘\’ before the dot in the pattern is important, to ensure accurate hostname matching.
Before you save your new filter, click “Verify this filter” to see how your data would have changed over the last seven days, had this filter been already active.
If you have been getting lots of ghost spam, you might see some lines in the table, showing the invalid hostnames, like this:

If you see any of your valid hostnames in this list, there’s a problem with your filter, so double-check your settings and re-verify it.
And any time you make a change to your filter settings, be sure to verify it before saving.
Once you’re happy with your filter, click “Save” to store the filter. It will start applying to your data in the view you just applied it to within 24 hours (although often it will start working almost immediately).
Remember, it’s best to test your new filters on your “test data” view for a few days, before applying it to your “active data” view, just to make sure you don’t lose any important data.
Optional – Include valid Google hostnames
If you want to add in the valid Google hostnames (from the list above), change your filter pattern to the following:
yourdomainname\.com|googleusercontent\.com|googleweblightagain replacing ‘yourdomainname’ with your actual domain.
Note: The character in the middle (|) is called a “pipe” and is usually found on the top of the backslash key.
Adding an existing filter to a view
Once you’re happy with your filter, you can apply the same filter to another view.
This way, you only have to set up a given filter once, and you can use it multiple times across your account, confident that it’s working correctly.

To add an existing filter to a different view, change to the view you want to add the filter to (e.g. your “active data”), view the filters and click “Add Filter”, in the same you did before when you were creating the filter.
But this time, instead of selecting “Create new Filter”, choose “Apply existing Filter”.
Select your filter on the left-hand side, and then click “Add” to move it across to the right-hand side add it to the current view.
Save your changes, and the existing filter will start applying to the data in the current view within 24 hours.
Step 3 – Filter out crawler spam
So now that you have a way to remove ghost spam from your data, the next step is remove crawler spam.
Remember, these are bots that actually visit your site, and leave a trail of junk data in their wake.
Because crawler spam actually visits your site, the hostname data is usually correct, so it’s not removed by the hostname filter you set up previously.
What crawler spam does generally instead is use a fake referring domain, in the hope that you’ll see it in your reports, and then visit that URL to see what it is.

NEVER EVER do this!
Chances are, you’ll end up with a virus, or some malware or some other nasty computer problem that will be a right pain to fix.
Instead, visit a site like GeoPeeker or WebPageTest, manually type in the suspicious-looking URL (or carefully copy and paste it), and see what shows up.
You can also do a quick Google Search for the domain, and see if the results look trustworthy.
You can see a perfect example of this in the image above.
This is a spammy URL from one of my sites, and when I type it into GeoPeeker.com, I get a tacky-looking “enter to win” lottery-style site, and you can bet your bottom dollar there’s no prize money at the end of this rainbow!
So let’s get rid of this rubbish.
There are two ways to do this: one involves creating more filters, which you now know how to do, and the other requires editing your htaccess file, which can be a little scary.
Regardless of which method you use, you’ll need to update your settings regularly to keep up with the ever-evolving spam landscape.
Let’s start with the filter method.
Use a campaign source filter
Step 1. Make a list of crawler spam
To filter out crawler spam, you first need to be able to identify it.
Although there are people who maintain up-to-date lists of spam crawlers, I’ve found that this still doesn’t remove it all, partly because spam crawlers change so rapidly, and also because the crawlers that visit their sites are not always the same ones that visit mine.
The best way to identify crawler spam is through your Google Analytics reports.
Because crawler spam doesn’t actually view your site content, usually it either has a 100% bounce rate or a 0% bounce rate, so that’s how we’re going to find it.
Go to Reporting > Acquisition > All Traffic > Referrals for your “active data” view, or whichever one has the junk data you want to find and stop.
Change your date range to cover at least the last 3 months, and as much as the last 12 months. Crawler spam changes quite rapidly, so there’s not much point in going back further than this.

You can add simple reporting filters to the data in the table by using the search box at the top right of your data table, but we’re going to need a slightly more complex filter.
Note: This kind of filter is not the same as the hostname filter you added previously. That kind of filter is a view filter and permanently and irreversibly removes data from your Analytics reports as it’s collected.
But the kind of filter we’re about to create is a reporting filter, which is a temporary filter that changes how the data is displayed in your reports.
A reporting filter doesn’t make any changes to your underlying data, but it’s really useful for viewing a subset of your data, as we’re about to do.
Click on “Advanced” next to the search box at the top right of your data table.
A new section will appear on the left above your data table.

Change the green dropdown that says “Source” to be “Bounce Rate”.
The easiest way to do this is to start typing “Bounce Rate” into the little search box that appears at the top of the list. Choose Site Usage > Bounce Rate.
Change the next dropdown value from “Greater than” to “Equals” and type 100 in the box at the end.
Make sure you click “Apply” and then wait for your report to be refreshed.

You should see a list of totally random-looking domains, like:
- keywords-monitoring-your-success.com
- fix-website-errors.com
- share-buttons.xyz
- traffic-cash.xyz
and other such nonsense. You may also see valid-looking domains in there, like plus.google.com, or touch.facebook.com.
Now it’s time to make a list of the rubbish domains.
Start a simple text document in Notepad, or a similar plain text editor (not in Microsoft Word), so you don’t get any fancy formatting in your list.
You can copy and paste them out of the Google Analytics report if you prefer, to make it a bit faster.
Here’s what goes on your list:
- If you recognise the domain, ignore it and leave it off your list
- If you’re not sure whether it’s a spam referrer, use GeoPeeker or WebPageTest, or do a quick Google search
- If you’re sure it’s spam, add it to your list
As an example, this is what my list would start out with:
traffic2cash.xyz
keywords-monitoring-your-success.com
ranksonic.net
share-buttons.xyz
and so on.
It’s up to you how far you go down your list. If you have lots of traffic, the spam crawlers with very little traffic won’t mess up your data too much, so you can stop once the number of sessions gets low enough.
Then we repeat the process, but this time, we set the Bounce Rate equal to zero.

Click on the “edit” link next to the search box at the top right of your data table, change the “100” to “0” and click “Apply”.
With this report, you’ll probably see more valid referrers, because some people come to your site, like what they see and stay.
But now that you’re more familiar with what spammy referrers look like, you should find it easier to spot them.
Go down your list as far as you want to, adding the spammy domains to your list, remembering to use GeoPeeker or WebPageTest for any you’re not sure about.
As an example, my list would start with:
rusexy.xyz
If you see things like “192.168.236.1” just ignore them. They may or may not be spam, but you can’t check if they’re valid and you can’t realistically filter them out.
Step 2. Create a regular expression
We’re going to filter out this crawler spam using something called a regular expression.
Basically it’s a pattern that Google Analytics matches against the traffic as it comes to your site, and it removes anything that matches up.
To make your regular expression, take your list of spam referrers, and put them all on one line, separated by the pipe character (|), which basically says “this OR this OR this” and so on.
It’s a very tall vertical line, and on my keyboard it’s on the backslash key, so I press SHIFT+backslash to type it. It’s NOT a lowercase L or the number 1.
Note: You don’t need a pipe at the start of the line or at the end of the line, only in between values.
Using my examples from above, my regular expression becomes:
Note: There’s a limit to the number of characters Google can accept in one filter field (255 characters), so if your list is long enough, you may have to split it into more than one line.
To save space, you can remove the .net or .com or .xyz part if the rest of the domain is blatantly spammy, and is unique enough to accurately identify the junk referrer, like this:
This regular expression is now ready to be used to filter out spam crawlers from your new data.
Note: Some people recommend adding in things like cheap|seo|money|buy and so on to your regular expression, but this may end up matching lots of valid domains, so it’s probably not the best idea.
Step 3. Create a segment
Before we create a view filter to remove this traffic, we’re going to create a segment, to make sure our regular expression is working correctly.
A segment is a bit like the reporting view we created earlier, but instead of filtering the data that appears in the table, it applies to all visits, and temporarily affects the content of all of your reports, as long as the segment is still active.
Like a reporting filter, a segment does not change the underlying data, just how it’s displayed.

To create a segment, go up to the top of your report view, above the chart, and next to where it says “All Users” with a blue circle next to it, click “Add Segment”.
Click the big red “New Segment” button.

Type in a name for your segment, such as “All Sessions – No crawler spam”.

Click “Conditions” under “Advanced” and change the settings as follows:
- Change “Include” to “Exclude”
- Change “Ad Content” to “Source” (under Acquisition)
- Change “contains” to “matches regex”
- Paste your regular expression text into the text box
Type “Source” into the search box the appears above the “Ad Content” field to narrow down your options to “Source”.

If your text won’t fit, or gets chopped off, because of the character limit on the text box, split it into more than one line, and add another condition by clicking the “OR” button at the end of the line to create additional condition lines.
As you edit your segment conditions, you’ll see the Summary view on the right-hand side update to show the effect of your segment, or you can click the “Preview” button at the top center to update it.
Because we’re trying to remove a small-but-annoying amount of spam from our data, the “remaining sessions” percentage value show in the blue-circle on the right should be be pretty high, but not 100%.
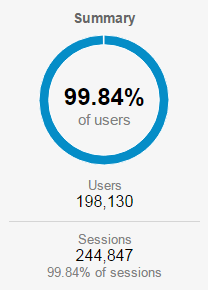
If it says 100%, then it’s likely that your segment is not working properly and it’s not removing anything from your data (unless you’re lucky enough to have thousands of real visits per day swamping your spam traffic). Double check your settings closely.
If your site doesn’t have much traffic, removing the spam may have a much bigger impact, but your figure should still be 90% or higher.
A quick check of five sites of different sizes shows values ranging from 91.40% to 99.98%, so your number will most likely be around that size as well.
In other words, even for a low traffic site, spam should make up less than 10% of your visits, and once your site starts to get more traffic, spam generally drops below 1% of your traffic.
If your “remaining sessions” figure is lower than 90%, look over your list of domains carefully to make sure you’re not matching and removing valid data.
Once you’re happy with your segment, click “Save” and it will automatically be applied to your data.
Note: If you need to edit your Segment, click on the little dropdown arrow to the top right of the segment name and click “Edit”.
If you look at your data table now, you’ll see a comparison of “All Users” with your newly created segment, and the segment figures should be slightly smaller than the “All Users” figures, which means that your segment is working correctly.
Yay! Your regular expression is working. You rock!
Step 4. Create a filter
Now that you’ve tested your regular expression, and you’re happy that it’s removing the naughty crawler spam from your data, it’s time to turn it into a view filter.
Change to the “Admin” section of your account, and select your “test data” view.

As you did before when creating the hostname filter, click “Filters” in the right-hand view column, click the “Add Filter” button, and change the settings as follows:
- Leave the method as “Create new Filter”
- Give your filter a name e.g. “Exclude spam referrers”
- Select “Custom” under Filter Type
- Leave “Exclude” selected
- Select “Campaign Source” under “Filter Field”
- Enter your regular expression into the “Filter Pattern” field
Don’t worry that you’re filtering on “Campaign Source” – this actually covers all “Source” values, including referrers, and is not limited to just marketing and ad campaigns.
Make sure to click “Verify this filter” before saving, to see if your new filter has any impact on your data.
Because this verification only uses the last 7 days of data, you may not see any impact.
Don’t worry if this happens, because we tested this with a segment previously, so we know it works, right?
If your regular expression is too long to fit into the “Filter Pattern” field, just split it into multiple lines like you did when you created the segment.
In this case, you’ll need to set up a whole new filter for each part of your regular expression, so you might end up with filters called:
- Exclude spam referrers #1
- Exclude spam referrers #2
- Exclude spam referrers #3
And so on.
Save your filter(s), let it run on your test data for a few days to make sure that it’s working correctly, and then add it to your active data view, the same way you did for the hostname filter.
Use an htaccess file
You can also use a special file called an htaccess file to stop spam crawler bots from accessing your site.
This file is named .htaccess and sits in the root directory of your website and contains rules that tells the server hosting your website how to behave.
It may already exist if a plugin on your site has created one, or if you’ve used one previously, or if your webhost has put one there for some reason.
The advantage of using an htaccess file is that it instructs the server running your website to block the spam bot as soon as they try and visit your site, so they never get as far as your website.
This effect is different from the campaign source filter, which removes the data from your Analytics account, but does nothing to stop the crawler visiting your site and using up resources.
However, there are some drawbacks to using htaccess files that you need to know before considering this option:
- One single character out of place in your htaccess file can take your entire site offline. To reduce this risk, you can edit it using a WordPress plugin. Many WordPress security plugins offer the option to edit your htaccess file as well.
- Not all webhosts accept or allow htaccess files, so it may not do anything it all, and in some cases can cause errors with your hosting
- You may need to use and understand FTP, or have a way to transfer files manually into the root of your website directory. You can also use your cPanel file manager to transfer and edit htaccess files.
- Using an htaccess file will not fix all crawler spam, because some of it doesn’t include a referrer value, so you’ll still need to use other methods as well to fully clean up your data
If you do want to use htaccess (and I only recommend it for the technically-adept and brave of heart) this is an example of the code you would need to add to your file, using my sample data from above.
# Block Referrer Spam

RewriteEngine on

RewriteCond %{HTTP_REFERER} ^https://.*website-analyzer\.info/ [NC,OR]

RewriteCond %{HTTP_REFERER} ^https://.*traffic2cash\.xyz/ [NC,OR]

RewriteCond %{HTTP_REFERER} ^https://.*keywords-monitoring-your-success\.com/ [NC,OR]

RewriteCond %{HTTP_REFERER} ^https://.*ranksonic\.net/ [NC,OR]

RewriteCond %{HTTP_REFERER} ^https://.*share-buttons\.xyz/ [NC,OR]

RewriteCond %{HTTP_REFERER} ^https://.*inboxdollars\.com/ [NC,OR]

RewriteCond %{HTTP_REFERER} ^https://.*rusexy\.xyz/ [NC]

RewriteRule ^(.*)$ – [F,L]
Add that code, modified to match your list of spam referrers, to your .htaccess file in your website root’s directory, using FTP, your cPanel file manager or a plugin.
If everything works, it will immediately prevent any traffic with those domains set as the referrer from visiting your site.
Powerful but scary stuff!
I’ve broken my websites more than once with tiny-but-critical errors in my htaccess files, so unless your site’s resources are regularly being drained by masses of crawler spam traffic, I’d recommend skipping the htaccess file and sticking to using the campaign source filter method instead.
Exclude old spam data
Great! You’ve now stopped the vast majority of spammy data from polluting your Google Analytics reports, but what about your old data?
If you remember, filters only apply to data moving forward, and have no effect on previously-collected data.
The answer? Use a segment.
And what did we create earlier to test our regular expression? A segment.
So the great news is that most of the work is already done. Just a few tweaks and you’ll be ready to view your fabulously clean data, both new and old.
Use a segment
To view your old junk-filled data without the junk, we need to create a segment that uses the rules from both your hostname and campaign source filters.
So let’s go back to the “All Sessions – No crawler spam” segment we created earlier and update it.
Make sure you’re in the “Reporting” section of your account and click on “Add Segment” at the top-middle, above the chart.

Find the “All Sessions – No crawler spam” segment and look to the end of the line, where it says “Actions”.
Click the dropdown arrow and select “Edit” to return to the editing window for the segment.
Click the “Add Filter” button under your “Source” condition to add another condition.
This time, change the settings as follows:
- Leave “Include” as it is
- Change “Ad Content” to “Hostname” (under Behavior)
- Change “contains” to “matches regex”
- Paste your regular expression from your hostname filter into the text box
Using our example from before, you could enter either yourdomainname\.com or yourdomainname\.com|googleusercontent\.com in the text box, again replacing ‘yourdomainname’ with your actual domain.
You’ll also want to rename your segment to ‘All Sessions – No spam’ because now you’ve also removed ghost spam as well as crawler spam from your data.
Save your segment and revel in your newly cleaned data!
You now can move to any report in your account, and that segment will stay active, allowing you to see the true activity on your website, without all of the Google Analytics spam.
And any time you come back to your account, you can add that segment to view your data spam-free.
I find that because I’m usually looking short-term and forwards with my data, I don’t often use my “spam free” segment because my filters are doing their job and keeping my data mostly clean.
But it’s nice to have it there when you’re looking back at older data, and it’s also the perfect way to test any updates to your filters before you apply them to your views.
And eventually, once you’re consistently removing most of the Google Analytics spam your “active view” using the above techniques, you can add this segment to see just how clean your data is. I think you’ll be pleasantly surprised at just how little spam is left.
Note: Some data in Google Analytics is not compatible with segments, so if you’re viewing a report, and the data looks totally different from what you expected, try removing the segment to see if that fixes things.
Remove yourself
There is one more source of data that can mess up your reports, and that’s you.
If you’re anything like me, you visit your own website frequently, to make sure everything’s working correctly, or simply to admire your handiwork.
But this self-generated traffic can actually make it hard for you to see what’s going on with your customers as they visit your website.
So what can you do about it?
There’s a couple of things you can do to reduce the impact of your browsing from your Analytics reports.
Filter out your IP address
If you usually visit your own website from an internet connection that has a fixed or stable IP address, you can filter out traffic from that address.
My internet service provide doesn’t provide a fixed IP address, but it also doesn’t change very often (only every 6 – 12 months), so I use an IP address filter to remove my visits to my own websites from my Google Analytics data.
You can find your own IP address by going to Google and searching for “my ip address”. Google will give you the answer right there in your browser, and it should look something like this:
123.456.789.120If you start checking (and recording) your IP address every day for a week or two and find that it stays constant over time, it’s definitely worth setting up this additional filter in your account.

To create an IP address filter, we’ll do the same as we did before when creating the hostname filter – click “Filters” in the right-hand view column and click the “Add Filter” button, and change the settings as follows:
- Leave the method as “Create new Filter”
- Give your filter a name e.g. “Exclude self (123.456.789.120)”
- Leave “Predefined” selected under Filter Type
- Select “Exclude” under “Select filter type”
- Select “traffic from the IP addresses” under “Select source or destination”
- Select “that are equal to” under “Select expression”
- Enter your IP address into the “IP address” field
Remember, you’ll need to update this filter any time your IP address changes.
If you don’t have a fixed or stable IP address, or your regularly visit your website from a range of locations, devices or networks, then this method won’t work for you.
There are some more complex server and code-based solutions to remove your own visits from your data when you don’t have a fixed IP address, but they’re not 100% reliable and are often tricky to implement.
If you use Google Chrome to browse your site, there is a handy extension you can use called Block Yourself from Analytics that will stop your visits being recorded, but only for the sites you specify.
For other browsers, you can install Google’s Opt-Out Browser Add-on. Sadly, it blocks Google Analytics for all sites, not just yours, so it’s not an ideal solution.
Remove development copies of your website
Some webhosts, including SiteGround and WP Engine, make it really easy for you to create a copy of your site for testing new plugins, code and themes, but when you do this, you may also be sending lots of irrelevant data from these sites to your Google Analytics account.
To ensure that these development sites don’t muddy your Analytics data, you can filter out traffic from specific “test” subdomains of your site to ensure that the data is not included in your reports.
If the location of your test site is something like trainingsite3.staging.wpengine.com, then your existing valid hostnames filter will remove this data from your reports, and you don’t need to do anything more.
But if it’s something along the lines of staging1.yourdomainname.com, then your visits to your test site may very well end up in your reports (especially if you don’t have your IP address filtering out your visits) so you’ll want to set up a new “development” hostname filter.

To create a development website filter, we follow the same process as we did when creating the hostname filter – click “Filters” in the right-hand view column and click the “Add Filter” button, and change the settings as follows:
- Leave the method as “Create new Filter”
- Type a name for your filter in “Filter Name” e.g. “Exclude test traffic (staging1.yourdomainname.com)”
- Select “Custom” under “Filter Type”
- Leave the type as “Exclude”
- Select “Hostname” under “Filter Field”
- Enter
staging1\.yourdomainname\.comin the “Filter Pattern” field, replacing ‘yourdomainname’ with your actual domain
Verify your filter before saving it, and remember to test it on your “test data” before applying it to your “active data”.
You may not see a big change in data, depending on how much you’ve been using your staging sites, but it’s good to have this one in place for those times when you’re testing things like crazy.
Remember to update or add a new filter if your staging site name changes, or if you set up additional development sites.
Advanced methods
There are a few more tricks you can use to clean up your data even more if you want to.
There is a diminishing return on each of these – in other words, the work involved doesn’t have nearly as much impact as what you’ve already done, but it does provide a way to have an even better view of the true activity on your website.
Filter out ‘not set’ screen resolutions
Many times, crawler spam doesn’t include a setting for screen resolution, and so their junk sessions show up with the value ‘(not set)’, even if they have a valid hostname and an apparently valid referrer.
You can use this to your advantage by adding a condition for screen resolution to both your segment and your filters.
To see the size of the impact of this on your data, visit Audience > Technology > Browser & OS in your reports.
Click on “Screen Resolution” next to “Primary Dimension” and add “Hostname” as a secondary dimension.
If you sort by Screen Resolution (in ascending size), you’ll see a bunch of sessions at the start with ‘(not set)’ as the value, and various values under ‘Hostname’.

To add this to your “All Session – No spam” segment, edit your segment as before, and add the following condition:
- Change “Include” to “Exclude”
- Change “Ad Content” to “Screen Resolution”
- Change “contains” to “matches regex”
- Paste
^\(not set\)$into the text box

Preview and test your segment to make sure it’s working properly, before using it to create a new filter with the following settings:
- Leave the method as “Create new Filter”
- Give your filter a name e.g. “Exclude ‘not set’ screen resolution”
- Select “Custom” under Filter Type
- Leave “Exclude” selected
- Select “Screen Resolution” under “Filter Field”
- Enter
^\(not set\)$into the “Filter Pattern” field
Make sure to verify your filter before saving, and start with your test data for a few days before applying it to your active data.
And happily, like your hostname filter, this filter will continue to remove junk visits from your data, even if the other details about the spam bots change over time.
Filter out fake languages, search terms and events
Some spam bots have started inserting junk domains into fake search terms, fake events and even into fake languages.
If you see something like ‘secret.google.com’ appearing in your reports, this is yet another attempt to get you to click on a spammy URL.
The key to getting rid of all of this junk is to understand that none of these fields – languages, search terms and events – should normally include full stops.

You can add a condition to exclude junk languages from your past data in your reports, by editing your “All Session – No spam” segment as before, and adding the following condition:
- Change “Include” to “Exclude”
- Change “Ad Content” to “Language”
- Change “contains” to “matches regex”
- Paste
\.into the text box
To remove the fake languages from your data ongoing, you can set up an additional filter with the following settings:
- Leave the method as “Create new Filter”
- Give your filter a name e.g. “Exclude fake languages”
- Select “Custom” under Filter Type
- Leave “Exclude” selected
- Select “Language Settings” under “Filter Field”
- Enter
\.into the “Filter Pattern” field
Remember to verify this filter before you save it, and apply it to your test data for a few days before adding it to your active data view.
You can repeat this process for search terms and events, using the following filter fields:
- Search Term
- Event Category
- Event Action
- Event Label
assuming that none of these values should legitimately contain full stops.
Use a security plugin to block IP addresses and countries
There are a number of WordPress plugins available that you can use to block specific IP addresses or countries from accessing your site, including WordFence and WP Ban.

However, this requires that you identify which IP addresses are problematic and manually add them to a list.
Your security plugin may provide you with the IP addresses that have been misbehaving on your site, or you may need to look through your website logs to identify the source of the Google Analytics spam bots.
You may also inadvertently block genuine users if you block shared IP addresses, IP addresses ranges or entire countries.
And it’s very likely that spammers change their IP addresses regularly anyway, so even if you block an IP address, it may only help for a month or two.
This is not a method I use very often, although I have blocked an annoying IP address once or twice using Wordfence.
Ultimately spam can come from anywhere, so this approach has limited effectiveness, although I do highly recommend the use of a security plugin to keep your website safe.
You’ll need to refer to the user guide for your chosen plugin to figure out how to add an IP address to a “block” list.
Use htaccess to block IP addresses, fake user agents & redirect spam
IP addresses
You can also block IP addresses using an htaccess file.
I’ve covered the risks and benefits of using and editing htaccess files previously, but the short and long of it is that there are some big downsides to working with htacess files, so I don’t generally recommend it unless you’re fairly technically competent.
Also, the limitations discussed above on blocking by IP address apply here as well, so it does have limited effectiveness.
But if you want to block an IP address using htaccess, then this is an example of the code you’ll need to add to your htaccess file:
# Block Spam by IP Address

order allow,deny

deny from 191.210.147.104

deny from 123.456.789.012

allow from all
Replace the IP addresses in that list with the spammy IP addresses you’ve identified.
Fake user agents
You can also block what are called “rogue” or fake user agents using your htaccess file.
A user agent is a piece of information that a device (a computer, mobile phone or tablet) sends to the server hosting your website, along with other information like date, time, IP address, page visited and so on.
The user agent for a real visitor will include data about the browser they’re using and their device’s operating system, but spam bots show up to your server as odd-looking “user agents”, so you can use that to block them from accessing your site.
Maintaining this kind of list in your htaccess files requires going through your website logs on a regular basis to identify rogue user agents and may take more effort than you’re willing to spend for the minor impact it has on your data.
But if you do want to give it a go, here’s some sample code for your htaccess file to get you started:
# Block Spam by User Agent

RewriteEngine On

RewriteCond %{HTTP_USER_AGENT} Baidu [NC]

RewriteCond %{HTTP_USER_AGENT} Download.Devil [NC]

RewriteCond %{HTTP_USER_AGENT} SiteSucker [NC]

RewriteRule ^(.*)$ - [F,L]
You can also check out this massive list of known fake user agents.
Redirecting spam
You can also use htaccess rules to deflect referrer spam back to the source, but that’s getting into pretty deep htaccess ninja tricks, so I’m putting it here more for interest than anything else.
Here’s an example of the code you might use for doing this:
# Redirect referrers back to source

RewriteEngine on

RewriteCond %{HTTP_REFERER} !=""

RewriteCond %{HTTP_REFERER} website-analyzer\.info [NC]

RewriteRule ^ %{HTTP_REFERER} [R,L]
You’d need a copy of this code for each spam referrer, which would make your htaccess file pretty huge, and reasonably hard to maintain.
The other reason I’m not keen on this approach is that rather than blocking the spam and stopping it dead in its tracks, you’re potentially adding to the spam traffic on the internet by bouncing it back at the supposed referrer, which is less than ideal, especially if they use a valid-but-false domain like google.com or facebook.com.
Create rules in Google Tag Manager
If you’re using Google Tag Manager, you can add rules that block traffic by hostname, IP address and more, and you can use the Tag Manager rules in place of your filters and/or htaccess rules.
The advantage of doing things this way is that the traffic doesn’t trigger your Analytics tracking code, so it never even reaches your Analytics account in the first place (although it still does consume server resources), and it doesn’t require editing htaccess files.
The downside is that is requires that you’re using Google Tag Manager, which adds yet another tool you need to master (and manage) in get your website tracking working properly.
But if you are using Google Tag Manager, it’s certainly a very neat way to combine the best features of filters and htaccess files for stopping Google Analytics spam.
Just mirror the settings you’ve been using in your filters, in the rules you create in Google Tag Manager instead, and you should be set.
Use an external service
If this all sounds like too much, then there are some external services available that will manage your Google Analytics spam for you.
Here are three for you to look at:
- Google Analytics Referral Spam Filter Wizard @ Quantable (free, manual)
- Referrer Spam Blocker (free, manual)
- Google Analytics Auto Spam Filters @ Analytics-Toolkit.com (from $15 a month, automatic)
These services are definitely convenient and generally cost-effective, but they do still require you to understand what you’re doing, to avoid losing important data.
You’ll also need to give these services access to both read and modify your Google Analytics account, and for the manual services, you’ll also need to go back regularly and run their tools again to update your settings.
And as always you’ll still need to use a segment to view a spam-free version of your data.
Ongoing maintenance
The war against spam is never ending, so sadly, you can’t do all of this just this once and then forget about it.
If you want to keep your Google Analytics data clean and useful, you’ll need to keep an eye on your data and regularly update your filters and segments.
Monitor site regularly and update filters
On a regular basis, you’ll want to go back into your Analytics account and do this:
- Update your list of crawler spam referrers
- Update your crawler spam regular expression
- Update your “no spam” segment
- Update your “exclude spam” filter
following the steps we used previously to create each of these things.
Checking monthly is probably often enough – any more often and you might not have enough data to see any changes, any less often and the junk data can start to build up in your account.
If you have a site with thousands of visit a day or a ton of new spam on a regular basis, you may want to check and update your filters weekly.
If you’re using htaccess or one of the advanced methods, you’ll want to update your rules there as well.
You shouldn’t need to update your valid hostname or your ‘not set’ screen resolution filters, because they keeping working no matter how the spam changes.
You’ll also want to check in on any filters you have running on your test view, and add them to your active view, if you’re happy that they’re working correctly.
You may also want to come back and check these instructions occasionally, in case there have been any updates or additions.
Use custom alerts to monitor traffic spikes
You can also set up custom alerts in Google Analytics to notify you if there’s a big change in the traffic to your website.

Sometimes a big change in traffic might be the result of all the work you’re doing to promote your website, but sometimes it can be caused by a sudden influx of new spam bots.
One of the first things that happens when you get an increase in spam traffic, is that the average length of a session decreases, because bots usually just arrive and leave straight away, often having a session duration of 0:00.
To set up a custom alert for this, make sure you’re in the “Admin” section of your account, with the correct property and view selected.
In the right-hand column, under “View”, scroll down to the section titled “Personal Tools & Assets” and click on “Custom Alerts”.
You should see a screen that looks something like this:

Click “New Alert” to add a custom alert to your account.

To be notified when your average session duration drops, change the settings as follows:
- Enter a name for your alert e.g. “Big decrease in time on site (daily)”
- Apply to the current view (i.e. your “active data” view)
- Leave “Period” set to “Day”
- Check “Send me an email” (you can add other email addresses here if you want to)
- (Optional) Set up your mobile phone to receive SMS alerts
- Leave “This applies to” as “All Traffic”
- Change “Alert me when” to “Avg Session Duration”
- Change “Condition” to “% decreases by more than”
- Enter ’50’ in “Value” (making the value 50%)
- Change “Compared to” to “Previous day”
You may need to tweak these settings to suit your current website traffic and level of spam, but it’s a good place to start.
If you find you’re getting too many “false alarm” emails, try increasing the percentage value to 60, 70, 80 or higher.
Another common change in your data with an increase in spam traffic is that the bounce rate goes up, again because bots usually just visit one page, and then leave straight away.

To be notified when your bounce rate increases noticeably, create an alert with the following settings:
- Enter a name for your alert e.g. “Big increase in bounce rate (daily)”
- Apply to the current view (i.e. your active data view)
- Leave “Period” set to “Day”
- Check “Send me an email” (you can add other email addresses here if you want to)
- (Optional) Set up your mobile phone to receive SMS alerts
- Leave “This applies to” as “All Traffic”
- Change “Alert me when” to “Bounce Rate”
- Change “Condition” to “% increases by more than”
- Enter ’50’ in “Value” (making the value 50%)
- Change “Compared to” to “Previous day”
Again, you may need to tweak these settings if you’re getting too many emails, but start with this set-up and see how it goes.
With these two custom alerts set up, you’ll know that your data has been affected by a spike in spam traffic almost as soon as it happens, so you can do something about it and keep your data in good shape.
Keep in mind that both of these alerts can be triggered by other factors, such as sending a large volume of poorly-targeted traffic to your site, but even so, you’ll want to know about that as soon as possible as well, so you can adjust your approach.
Create annotations for big spam spikes
Even with all of your filters and alerts in place, you may still have times when the spam gets out of hand, and makes a mess of your data.
Although you can remove it temporarily with your “no spam” segment, it’s also worthwhile making notes on your account when this happens so that’s easy to see in future what caused the change in your data.

To do this, you can create what’s called an annotation.
Make sure you’re in reporting view, viewing any of your reports that display a timeline with a graph above it.
Click on the small downward arrow under the bottom line of the graph to expand the “annotations” list.

If you’ve never used annotations before, or if you’re viewing a date range without any annotations, then this section will be empty.
To add an annotation, click the “Create new annotation” link at the far right.
Change the date (if required), type a clear and helpful description of what happened on the date and click “Save”.
An annotation marker will be added to the bottom line of the graph, and you can click this marker while viewing any report to expand the list of available annotations for the displayed time period.
Hide the list of annotations by clicking the small upward arrow at the middle center of the list.
It’s a good idea to get into the habit of adding an annotation to your “active data” view every time there’s a significant change in your data, or when you make a change to your account or view configuration.
This way, in 12 months’ time, when you’re trying to figure out where that big spike in traffic came from, you can quickly and easily find the answer.
Enjoy your clean data
Well done for making it this far.
If you’ve implemented everything in this tutorial, then you’re well on your way to a super-clean, incredibly-useful set of data in your Google Analytics account.
Woo hoo!
![]() Bonus Video: If you want to see how to create a filter in your Google Analytics account, make sure you grab my video walkthrough that takes you step-by-step through the process of creating a filter, so you can feel confident that you know exactly what you’re doing.
Bonus Video: If you want to see how to create a filter in your Google Analytics account, make sure you grab my video walkthrough that takes you step-by-step through the process of creating a filter, so you can feel confident that you know exactly what you’re doing.
I’ll also share with you a “magic” link that will instantly set up a done-for-you no-spam segment in your Google Analytics account, ready for you to add your domain name and start viewing your cleaned-up data straight away.
And have a spam-free day!
Nikki, The Biz Pixie
Updates
23 Nov 2016 – Added instructions for fake languages, search terms and events
References
- https://help.analyticsedge.com/article/definitive-guide-to-removing-google-analytics-spam/
- https://www.megalytic.com/blog/how-to-filter-out-fake-referrals-and-other-google-analytics-spam
- https://carloseo.com/removing-google-analytics-spam/
- https://support.google.com/analytics/answer/1034842?hl=en
- https://moz.com/blog/stop-ghost-spam-in-google-analytics-with-one-filter
- https://moz.com/blog/how-to-stop-spam-bots-from-ruining-your-analytics-referral-data
- https://www.optimizesmart.com/geek-guide-removing-referrer-spam-google-analytics/
- https://raventools.com/blog/stop-referrer-spam/
- https://blog.analytics-toolkit.com/2015/guide-referrer-spam-google-analytics/
- https://www.lunametrics.com/blog/2015/12/10/basic-google-analytics-filters/
- https://www.lunametrics.com/blog/2014/03/11/goodbye-to-exclude-filters-google-analytics/
- https://www.thesempost.com/why-google-doesnt-use-google-analytics-for-ranking-purposes/
- https://www.webanalyticsworld.net/2015/01/google-analytics-custom-alerts-which-you-must-always-use.html
- https://www.guaranteedseo.com/blog/6-useful-google-analytics-custom-alerts/
- https://www.azanweb.com/en/5-ways-to-exclude-your-own-visits-from-google-analytics/
- https://www.lunametrics.com/blog/2015/04/27/internal-traffic-google-analytics/
Updates
8 Sep 2021 – Removed broken links and updated redirected links